TL;DR
I built a lightweight email subscription system for my personal blog using Resend for email delivery, Cloudflare D1 for data storage, and Nuxt's Nitro server routes for API endpoints. The system handles signups, verification, and unsubscribes with no third-party marketing platforms — just API calls and SQLite. Zero monthly cost. The first verification email went to Gmail spam. I fixed it with a DMARC record and manual training. This post documents the entire process.
Background
I launched kbmjj123.cc as a space to write about building things — mostly indie development, technical decisions, and the occasional deep dive. A few weeks in, I had 0 subscribers (still do at the time of writing), but I've learned the hard way that infrastructure should arrive before traffic.
Email felt like a necessary piece. RSS works for the tech crowd but email reaches people where they already live. I needed something that checked a few boxes:
- Zero-cost — running entirely within free tiers, no monthly bill creeping up
- Lightweight — no ConvertKit, no Mailchimp, no platform lock-in
- On-brand — every touchpoint, including emails, should feel like part of the blog's pixel aesthetic
- Self-contained — subscriber data stays in my D1 database, not a third-party SaaS
I spent a few evenings building it. This post covers the architecture, implementation, and the DMARC surprise that no one told me about.
Architecture Decisions
Single Channel: Resend Only
I looked at Brevo (formerly Sendinblue) first because their free tier offers generous limits. But Brevo adds a Sent with Brevo watermark to all free-tier emails. For a blog that's intentionally minimal and pixel-clean, that's a non-starter.
Resend gives 3,000 emails/month free with clean branding and a developer-first API. At my current scale (zero subscribers), that's effectively infinite. Even if I hit 100 subscribers and send one newsletter per week, I'd use ~400 emails/month — well within free tier.
No Email Marketing Platform
This was a deliberate choice. ConvertKit and Mailchimp are great if you're running a newsletter business, but I don't need their features:
- Segmentation? I have one list.
- A/B testing? I send plain text + one image.
- Analytics? I just want to know if emails bounced.
All I need is a database table and an API client. The complexity-to-value ratio of a full marketing platform wasn't worth it.
Fetch Over SDK
Resend provides an official Node.js SDK. I skipped it. The SDK wraps a REST API and adds a layer of abstraction that I don't need — and in a Cloudflare Workers environment (which Nuxt's Nitro server routes run on), bundling extra dependencies is something I avoid unless necessary.
Calling the Resend API directly with fetch keeps the bundle lean and avoids compatibility issues.
No React Email Runtime
I considered @react-email/components — it's elegant, type-safe, and widely used. But rendering React components to HTML at runtime inside a Worker requires bundling React + react-dom. That's significant overhead for a single email template.
Instead, I wrote the email as a pure function that returns an HTML string. Same component-based architecture, zero runtime dependencies. The template stays in the codebase, not in a separate React renderer.
Implementation
D1 Schema
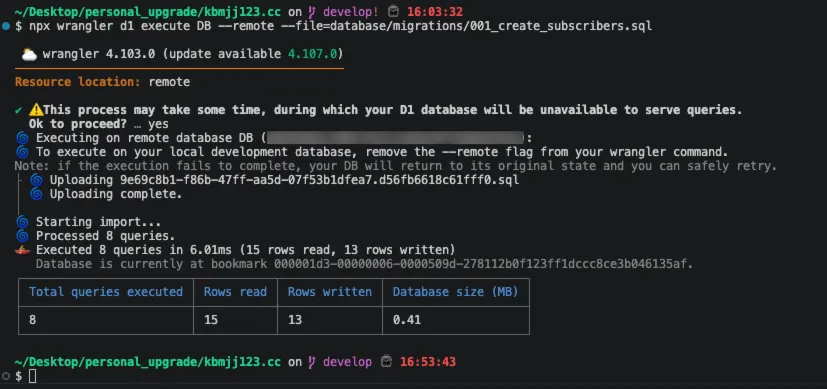
Cloudflare D1 is a serverless SQLite database that works seamlessly with Nuxt's Nitro server routes. I created two tables — one for subscribers, one for logs.
-- 001_create_subscribers.sql
CREATE TABLE subscribers (
  id                INTEGER PRIMARY KEY AUTOINCREMENT,
  email             TEXT NOT NULL UNIQUE,
  status            TEXT NOT NULL DEFAULT 'pending'
                    CHECK(status IN ('pending', 'active', 'unsubscribed')),
  verification_token TEXT NOT NULL,
  source            TEXT DEFAULT 'sidebar',
  subscribed_at     TEXT DEFAULT (datetime('now')),
  verified_at       TEXT,
  unsubscribed_at   TEXT,
  created_at        TEXT DEFAULT (datetime('now'))
);

CREATE TABLE email_logs (
  id            INTEGER PRIMARY KEY AUTOINCREMENT,
  subscriber_id INTEGER REFERENCES subscribers(id),
  email_type    TEXT NOT NULL CHECK(email_type IN ('verify', 'newsletter')),
  recipient     TEXT NOT NULL,
  subject       TEXT NOT NULL,
  status        TEXT DEFAULT 'sent' CHECK(status IN ('sent', 'failed', 'bounced')),
  resend_id     TEXT,
  error         TEXT,
  created_at    TEXT DEFAULT (datetime('now'))
);
The email_logs table is optional but useful for debugging delivery issues. When the first email landed in spam, I could check the log and confirm Resend accepted it — the problem was on the receiving end, not the sending end.
API Routes
Three endpoints under /api/subscribe/:
POST /api/subscribe           — Submit email → generate token → send verification
GET  /api/subscribe/verify    — Click link from email → activate subscription
GET  /api/subscribe/unsubscribe — One-click unsubscribe
The flow is straightforward:
- User submits email via the sidebar widget
- Server inserts a
pendingrecord with averification_token - Server sends a verification email via Resend
- User clicks the link in the email
- Server updates status to
active
Email Template: Pixel Aesthetic
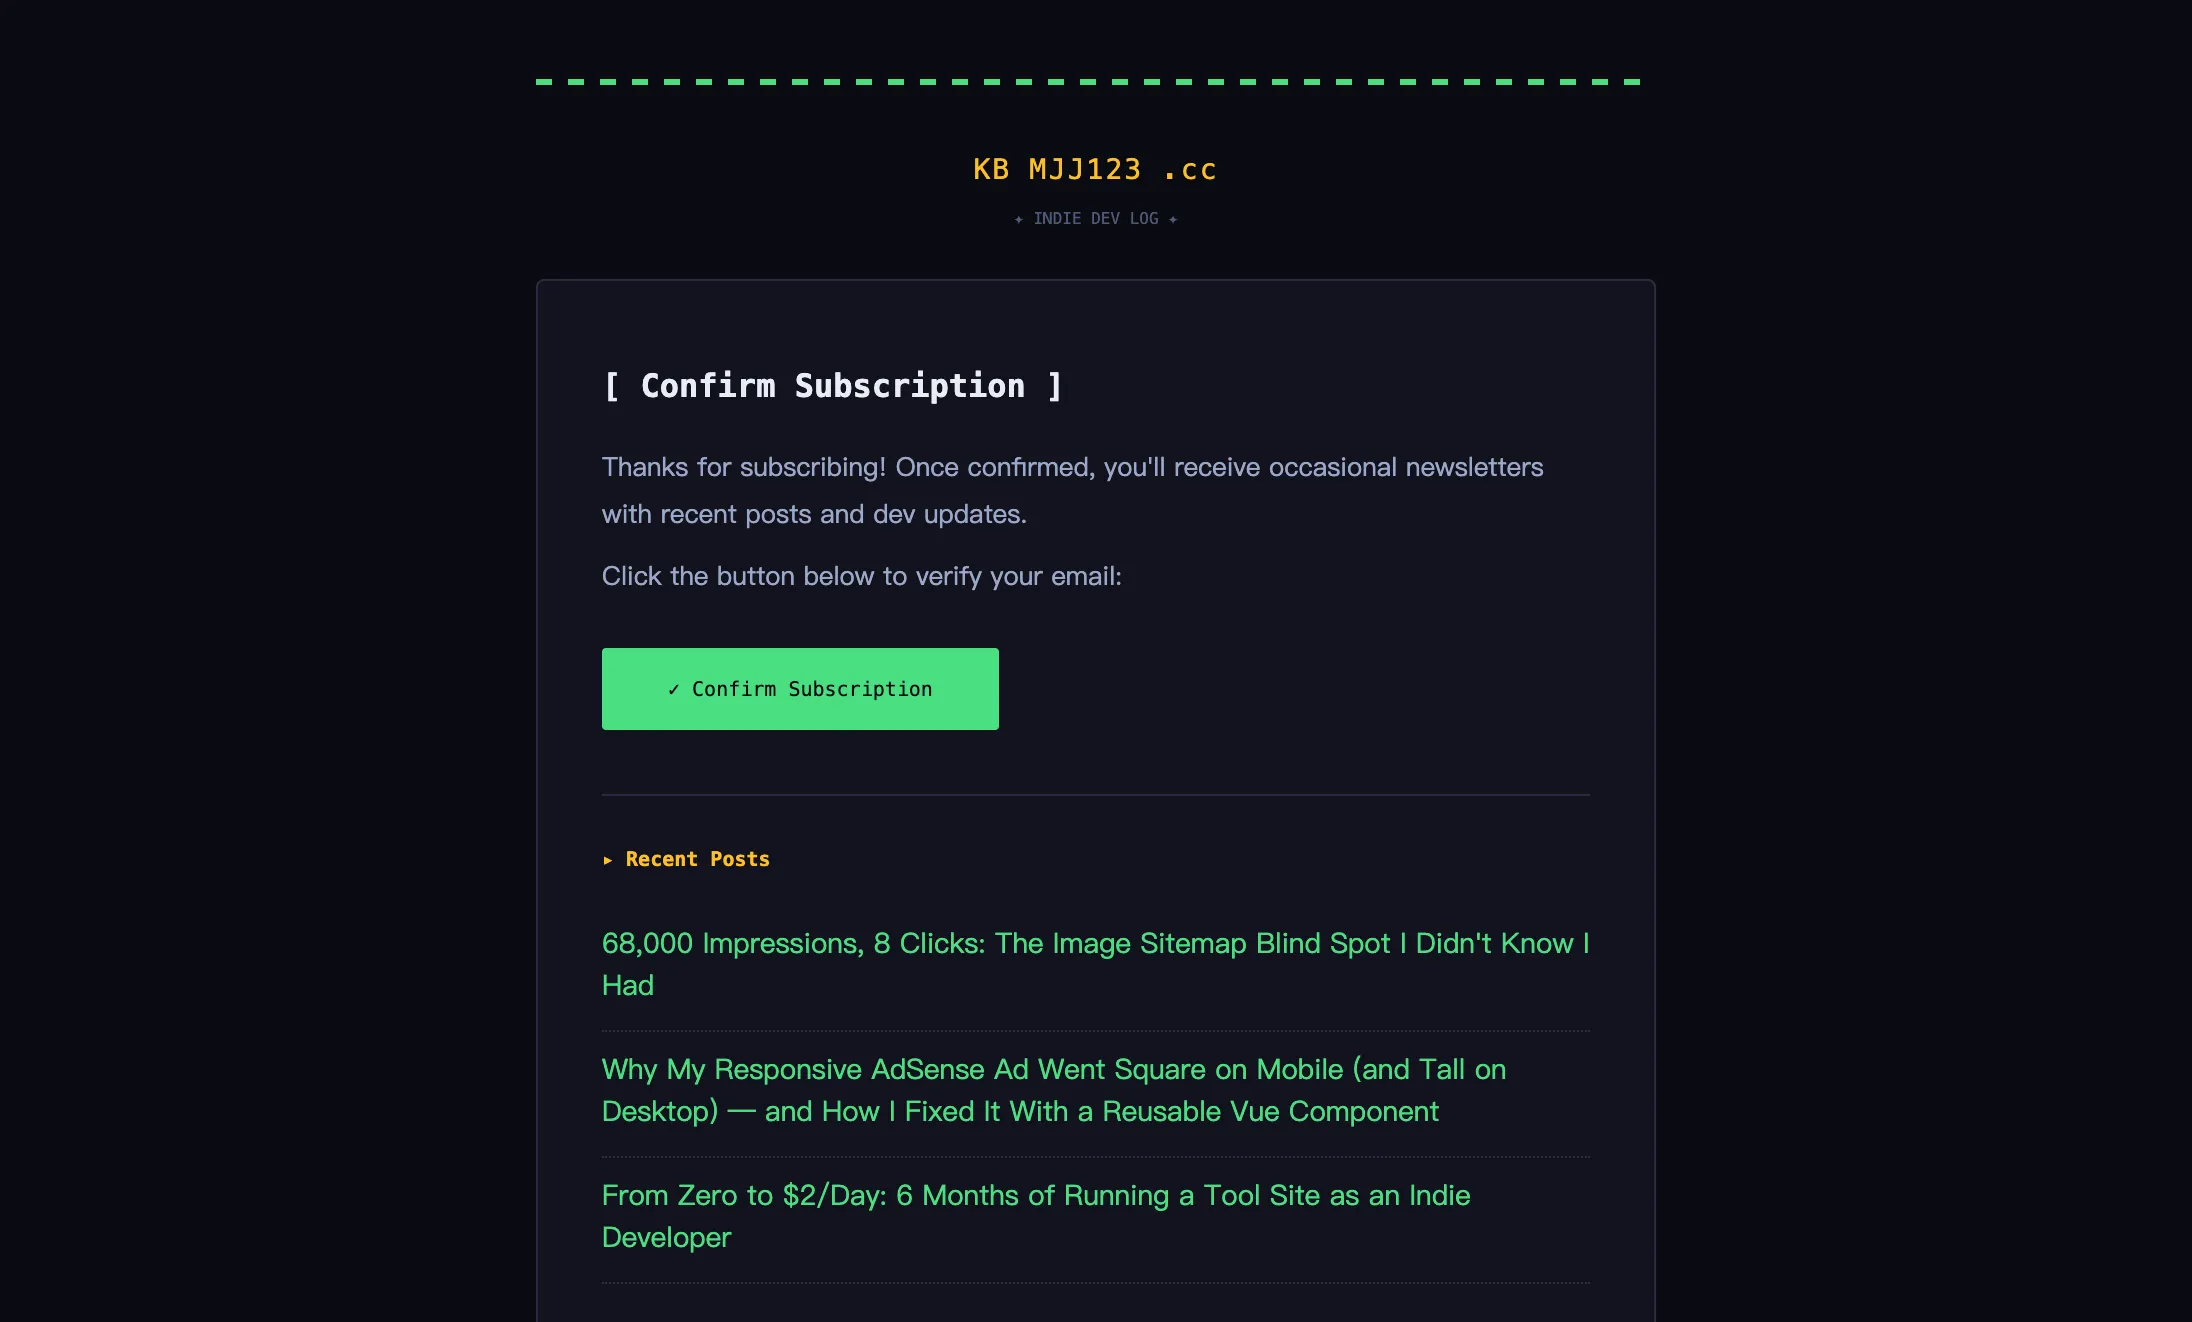
The verification email mirrors the blog's design system — a green dashed border, pixel font, and a minimalist layout that feels like it belongs on the site, not like a generic marketing email.
I used a monospace font stack ('Courier New', monospace) and inline CSS to ensure compatibility across email clients. The template includes:
- A green dashed bar at the top (matching the blog's header)
- The blog name and tagline in gold
- A confirmation button (styled as a link with button-like appearance)
- Recent posts — showing new subscribers what they'll actually get
Sidebar Widget
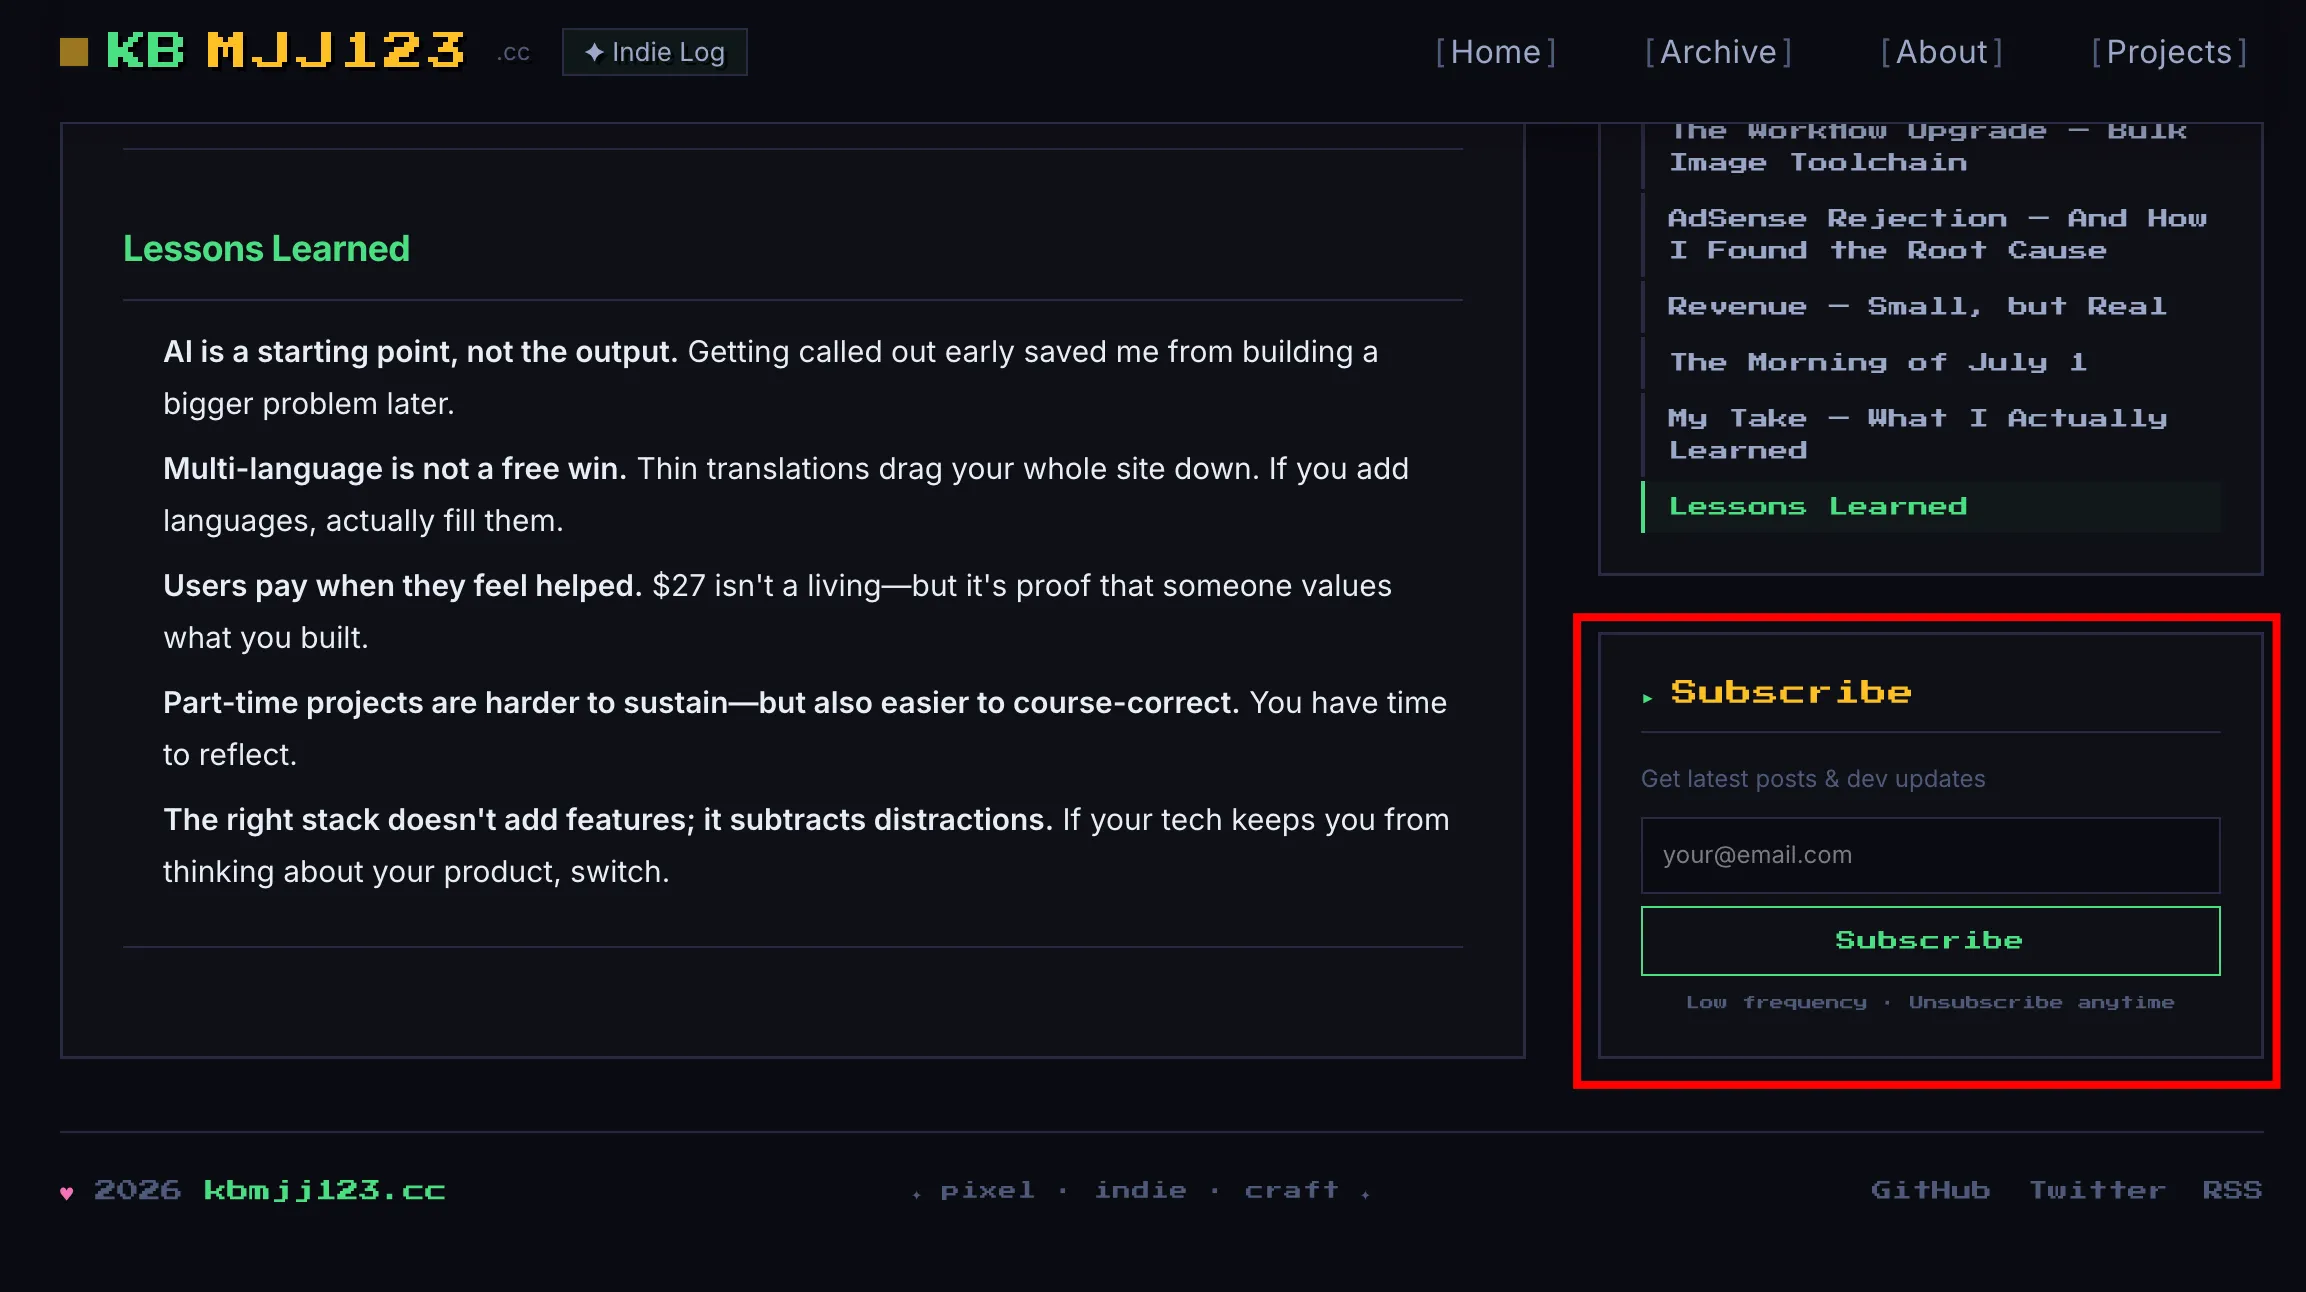
A Vue component with three states: idle, submitting, success/error. The design matches the pixel widget style:
- Dark input field with green focus border
- Gold pixel font for the heading
- Muted footnote: "Low frequency · Unsubscribe anytime"
The widget sits in the sidebar on article pages and on the homepage — anywhere a reader might want to stay updated.
Deployment & Config
The blog runs on Cloudflare Pages with the cloudflare-module preset. Environment variables are set in the Cloudflare Dashboard.
Step 1: Get a Resend API key
Sign up at resend.com, verify your domain, and generate an API key. Resend requires domain verification to send email — you'll need to add a DNS TXT record (DKIM/SPF) during domain setup. This is separate from DMARC, which I'll cover in the next section.
Step 2: Add the API key to Cloudflare Dashboard
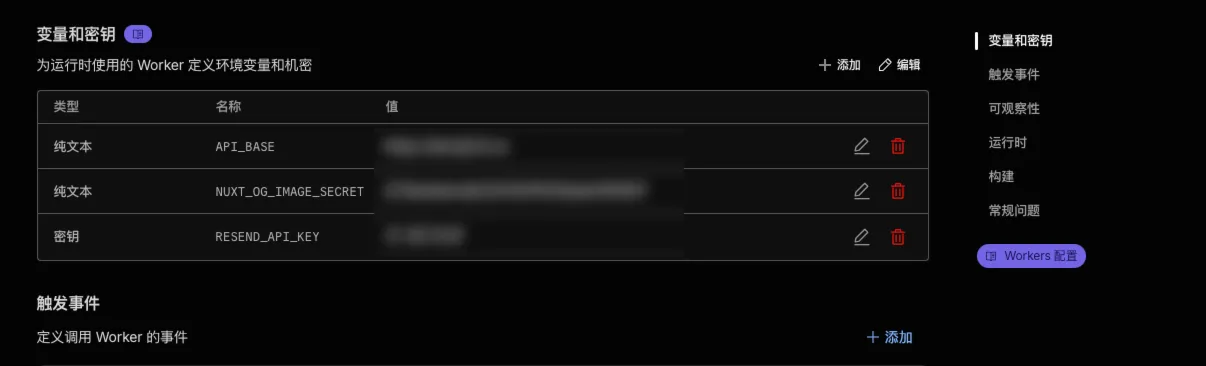
Go to Cloudflare Dashboard → Pages → your project → Settings → Environment Variables. Add a new variable:
RESEND_API_KEY = re_xxxxxxxxxxxx
Step 3: Create D1 database
npx wrangler d1 create kbmjj123-db
npx wrangler d1 execute kbmjj123-db --remote --file=server/database/migrations/001_create_subscribers.sql
Step 4: Bind D1 to the Pages project
In Cloudflare Dashboard → Pages → your project → Settings → Functions → D1 database bindings, add a binding:
Name: DB
Database: kbmjj123-db
Step 5: Deploy
git push
Cloudflare auto-builds and deploys the Nuxt project. The RESEND_API_KEY environment variable is available to server routes through process.env.
Things That Bit Me
The whole system worked locally on the first try — pnpm dev, filled in the form, got the email. Except the email didn't arrive in my inbox. It went to Gmail's spam folder.
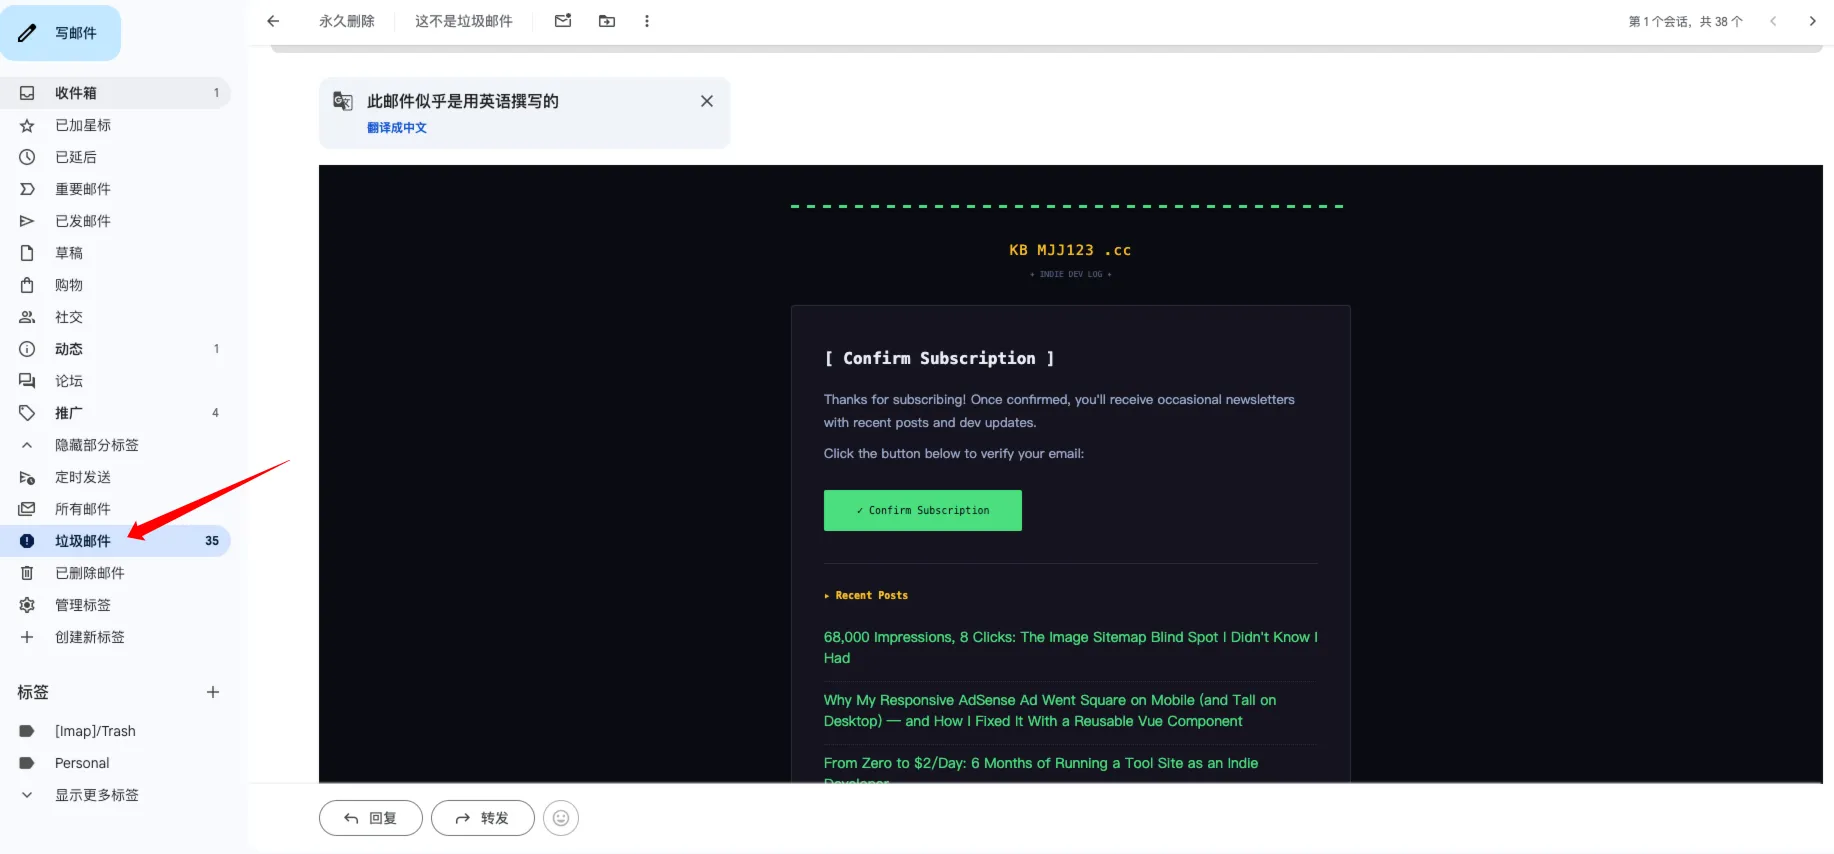
I checked the Resend dashboard. The API call succeeded, the email was sent. The problem wasn't Resend. It was my domain's email authentication.
Gmail shows a "Needs attention" warning for emails that lack proper authentication. The specific warning: No DMARC record found.
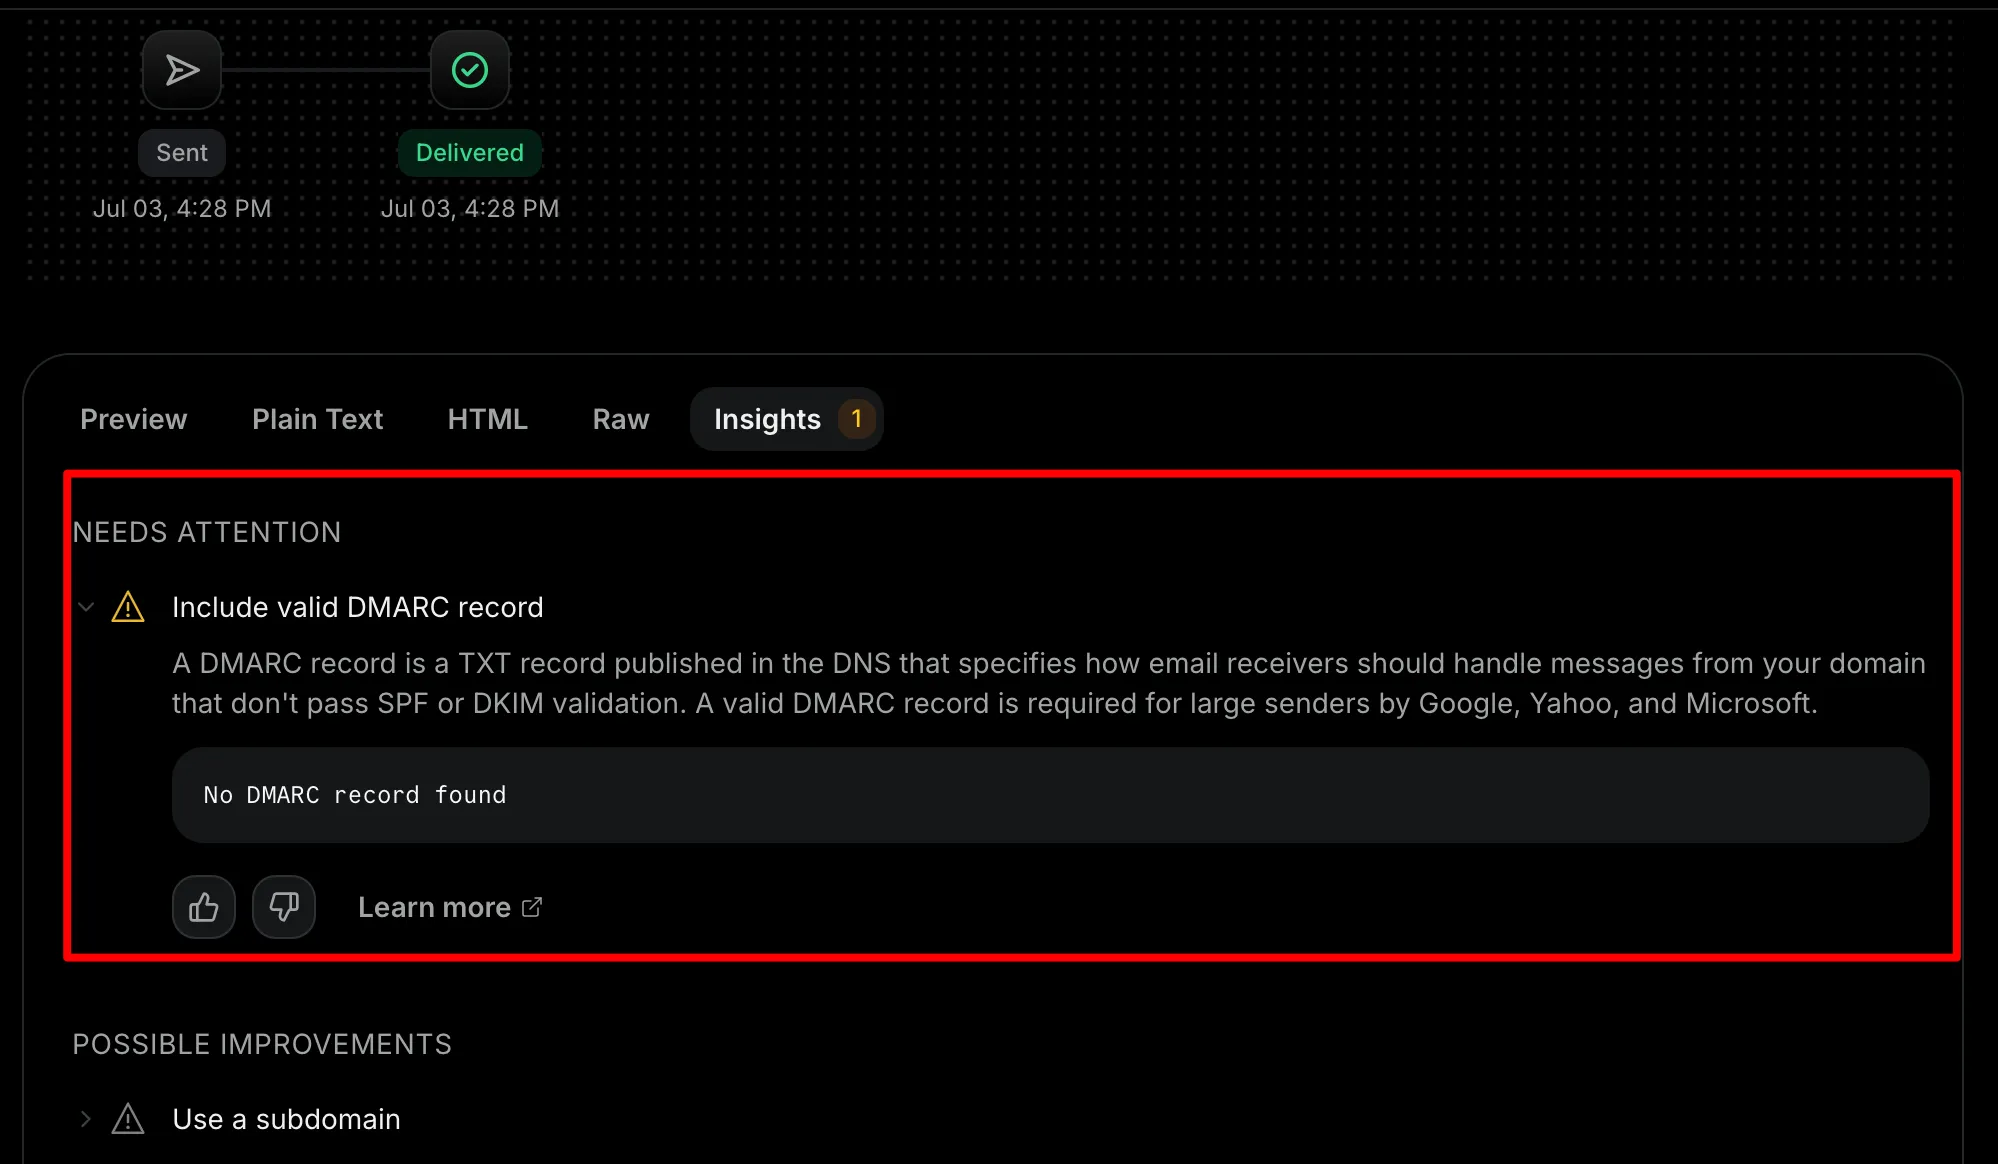
I knew about SPF and DKIM — Resend's domain setup required those. But DMARC was a blind spot. I never configured it because I didn't know I needed to.
What I did:
- Went to my domain registrar's DNS dashboard (Cloudflare DNS)
- Added a new TXT record:
Host: _dmarc.kbmjj123.cc Value: v=DMARC1; p=none - Waited a few minutes for propagation
- Manually moved the first verification email from spam to the inbox (this helps train Gmail that future emails from this domain are legitimate)
- Sent a second test email
The second verification email arrived in the primary inbox. The p=none policy tells email providers to monitor but not enforce — good enough for a personal blog with zero subscribers. I'll switch to p=quarantine or p=reject once I have more data and the domain has a sending history.
What I learned: Email configuration isn't just API keys and DNS verification. DMARC is a real requirement for Gmail deliverability, not an optional best practice. The "Needs attention" warning is clear, but only if you're looking in the right place.
Running It
If you want to replicate this for your own project:
# 1. Install dependencies
pnpm add resend

# 2. Create D1 tables
npx wrangler d1 create your-db-name
npx wrangler d1 execute your-db-name --remote --file=server/database/migrations/001_create_subscribers.sql

# 3. Local dev: set your Resend API key
echo "RESEND_API_KEY=re_xxx" > .dev.vars

# 4. Deploy
git push
Environment variables needed:
RESEND_API_KEY(from Resend dashboard)
DNS records needed (in addition to your domain's existing DNS):
- SPF / DKIM records (set up during Resend domain verification)
- DMARC record:
v=DMARC1; p=none(at_dmarc.yourdomain.com)
Lessons Learned
- Build infrastructure before you need it. I have zero subscribers. The system cost me a few evenings and no money. When someone does want to subscribe, it's ready. Waiting until after the first 50 readers would have meant rushing or using a platform I didn't want.
- DMARC is not optional for Gmail deliverability. The "Needs attention" warning is real. Add
_dmarcTXT records as soon as you configure any transactional email.p=noneis fine for starting — it won't break anything and gives you visibility. - Manual "not spam" training works. Moving the first email to the inbox and marking it as "not spam" helps train Gmail's filter. With a DMARC record in place, subsequent emails should land correctly without manual intervention.
- Stick to the stack you know. I could have used
@react-email/componentsor the Resend SDK. But thefetchAPI + pure HTML function approach just worked, with zero compatibility issues. For a personal blog, that's the right tradeoff.
What's Next
The system is live, but I'm planning a few iterations:
- Verification confirmation page — a pixel-themed landing page after verification, instead of a silent redirect to the homepage
- Newsletter archive — past emails available as posts, so readers can see what they missed
- Subscriber-only content — occasional deep-dives gated behind email (feeds the subscriber loop)
- Email preview workflow — a local dev server for email templates, so I don't need to send real emails for testing
But for now, the MVP is shipped. Three API routes, one sidebar component, one email template, two D1 tables. Zero monthly cost. One DMARC record that I'll remember next time.
Code available at github.com/kbmjj123/kbmjj123.cc.